Saturday, December 4, 2010

SPRAYING & WEED CONTROL

Any Vineyard's major challenge lies in controlling the pest/fungal attacks that occurs at regular intervals. This needs to be controlled at the right moment, which otherwise can directly effect the quality of grapes.

FOLIAGE SPRAYS:
Yellow Rust and Downy Mildew(which often is a weather driven disease) are noticeable on foliage (leaves) and will need immediate attention, failing which entire Vineyards can get quickly affected.
In India, we generally use fertilizers Acrobat (1 gm/liter of water) and Polyram (2 gm/liter of water) to prevent the fungal attack.


To efficiently make sure that uniform spraying is done and in a quicker way - we use a POWER SPRAYER (3 HP Pump) which runs on kerosene and starts with petrol.


WEED CONTROL:
The weeds around a Vineyard is surely an eye-sore and more than that - plant food is mostly eaten by these unwanted shrubs. Here we generally get affected by Part
henium / Grass and old deep roots present in soil.

A proper maintenance especially around the Vine (Grape Plant) will make sure that enough nourishment is reaching them. We can either employ laborers to manually remove these weeds or use a POWER WEEDER (a 2.5 HP petrol run pump) to brush off the weeds.

Below is a classy view of 'before' and 'after' a power weeder has been used:


POWER TILLING the land helps us in helping the soil breathe easily. Secondly, it also removes old roots and avoids future growth of weeds, after a period of time.


Until then, this process of weed control must be strictly followed to ensure, high quality of grapes.

Thursday, July 1, 2010

STEP 5 - NURSERY

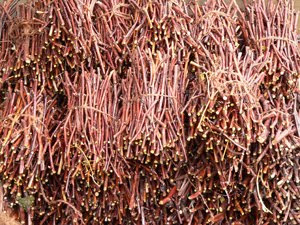
Once the Root-stock's are grafted with vine cuttings (in our case - SHIRAZ and CHENIN BLANC) as we saw in our previous article, it becomes important that we setup a Nursery to house some rootstocks that may come handy to fill gaps - wherever the grafting has failed.

For this, we first make the "cuttings" ready which has at least 3 nodes and would be approximately 10 cms in length. Then we dip them in an anti-fungal solution to cleanse the rootstock and avoid any further fungal growth. Then these clean cuttings are put in a polythene bag, which comprises of mud soil and farm yard manure (FYM), in 80:20 proportion.


To setup a Nursery:
1) Choose a reasonably flat land.
2) Have sufficient space to walk around.
3) Make sure water connection is close by -or water supplied using Sprinklers.

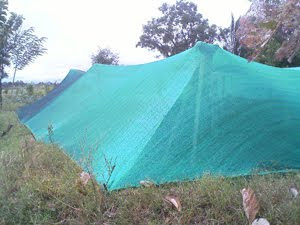
Shade-Net cloth of specific size is needed, which will allow minimum air in and maintain humidity of nursery. This can be stitched and can be used as top roof and side walls of nursery. These are supported by granite stone pillars, which acts as skeleton of nursery.

Once done the nursery would look something like this -
It's a good practice to setup Sprinkler system for water irrigation within a nursery. This gives a rain kind of effect and helps in humidity too.

Nursery needs to be supplied with water at least once in 2 days. This will make sure enough moisture is maintained and very soon the rootstock cuttings will start to sprout. Generally, it would need 3 weeks to show up new leaves, and constant watering is key for quick progress of rootstock plants.

All thinner plants are often segregated from good ones - and are given special attention with enough care to make sure budding happens eventually.
No special fertilizers treatment are required for root stocks, until unless we desire a lot of foliage in the plant.

The side walls of the nursery are pulled and tied at all corners to make sure it can withstand winds. A soft support system can be provided in the gap where the Shade net cloth touches every pole, to avoid friction and hence wear-tear of the cloth.

Thursday, March 18, 2010

STEP 4 - GRAFTING

Welcome to the exciting world of Vine-Grafting!! :-) Simply put, we club 2 grape varietals together -i.e., we use the existing Rootstock (see a detailed previous blog on Rootstocks) and graft a new Wine varietal to it. The Wine varietal can be your choice - of course based on terrior observations.

So here we go!! The first step in this process of Grafting begins with collection of pruned Wine varietals from existing farmers / research stations. I am consulting with Indian Institute of Horticultural Research (IIHR), Bengaluru and hence had direct access to accumulate SHIRAZ and CHENIN BLANC cuttings from the institute. The number of plants was notified to IIHR, whose team promptly had kept the cuttings ready.

I have chosen SHIRAZ / SYRAH (Red) and CHENIN BLANC (White) as my Wine varietals. Syrah or Shiraz is a dark-skinned grape grown throughout the world and used primarily to produce powerful red wines. This variety is also blended mostly with Cabernet Sauvignon and Merlot varietals. Chenin Blanc is a white wine varietal and Its high acidity means it can be used to make everything from sparkling wines to well-balanced dessert wines.

A team of expert Grafters from Nashik were housed for this activity. They started by reducing the length of these cuttings to an inch and half - making sure a proper bud selection is made, which will later transform into main plant. Once the cuttings were being made ready, another parallel activity was happening on Vineyard. We started removing or trimming Rootstocks and left out two of the best lot. We generally choose two stocks because just in case grafting fails in one, the chances of the other stock surviving is high. As shown here - the work has begun, where a small slit is made in the rootstock and the wine varietal is being inserted into it. Then to keep them intact, a thin plastic is wound across the grafted area.

A view of how a trimmed and grafted row looks like - note here every rootstock has been grafted twice, by choosing 2 of its strong shoots. The leaves / foliage is also thoroughly trimmed to accommodate grafting process. We make sure that the Rootstocks are not watered the previous day, to keep the area dry.
Another snap here shows you a clear representation of how the new Vine (Wine varietal) is married to existing Rootstock. Now the wait begins - till the grafted SHIRAZ begins to bloom! Extra care needs to be taken as the plant is physically hurt and proper nutrients like UREA and Potash is supplied through drip irrigation.

The plant soon enters into what we call the "budding" stage, where the small SHIRAZ or CHENIN BLANC's bud starts to open up! There is a lot of excitement in air as every "bud-break" directly attributes to grafting success. This also means that we have been watering our Rootstocks well and supplying them with enough nutrients.
Our success rate was around 95% - with some rootstocks not responding to grafting either because there was continuous shade or the rootstock was not yet ready to hold onto other variety. We plan to replace the remaining 5% by the other successful stock or by own root varietals.

The next stage we work upon is setting up of NURSERY - to house the cut Rootstocks, which can be later used in Vineyard expansion stages or just as replacements.

Tuesday, February 23, 2010

STEP 3 - THE ROOTSTOCKS

The usage of Rootstocks, especially the "Dog Ridge" variety emerged in USA when a pest Phylloxera destroyed most of Vineyards.

We use Rootstocks as base plants on which the actual scion (cutting of Wine varietal plant) is "grafted".


The other way to setup a Vineyard is by using "own-roots", which means that we plant the scion directly into soil.

The advantages of going through the "grafted" way is better because:
1) This rootstock has strong resistance to root-knot nematodes, and has moderate Phylloxera resistance.
2) Own-rooted plants have a tendency to be less vigorous than grafted plants.
3) A rootstock can be used to compensate for certain site limitations such as - high pH or salinity levels.

This is how a Dog Ridge Rootstock would look like when it is around 3 weeks old.
The foliage is tremendous and we allow it to grow vigorously till the shoot system becomes strong.


Bingo!! Rootstock after 2 months of growth. This pic shows its relative height.

To propagate the growth of Rootstocks we use the following :
1) Humic Acid.
2) UREA.

Both are water soluble and this mixture is given through Drip Irrigation technique, which ensures uniform administration of nutrients and controlled use of water.

Rootstocks also store enough water in their systems - which will be used when scion is grafted onto them! Ideally of the whole lot, we would just want only two of the matured shoots to survive.


This is how a fully grown rootstock would look. There will be around 30-40 canes per plant. At this stage, we should be generally in the month of September, so as not to miss the grafting cycle in October. We may want to just retain only two canes of this - on which the next crucial stage of GRAFTING shall take place!


Sunday, February 21, 2010

Step 2 - FILLING THE TRENCHES

Filling the trenches is another key activity, during Viticulture process. The idea is to fill the one foot deep trenches with proper nutrients, so that the entire row gets nourished.


We add the following nutrients per plant:
1) Farm Yard Manure - 5 KG
2) Super Phosphate - 500 Gms
3) Neem Powder - 500 Gms
4) Pongmia Glabra Powder - 500 Gms
5) DAP - 200 Gms
6) Urea - 100 Gms

We calculate the number of plants that would be planted per row - and hence a general amount of the above said nutrients are mixed thoroughly and poured in the trench. In our case the distance between each plant would be 4 feet versus the distance between the trenches which was 8 feet.


The trenches are then let open for a duration of 12 hours before they are closed back with care.

Then after a couple of days, the trenches are watered profusely to make sure the nutrients are thoroughly dissolved and making way for us to plant Rootstocks!

We will know more about Rootstocks (Dogridge) in tommorrow's blog!

Till then..